In part 4 of the series, I'm going to show you how to use EF Core with MongoDb in Blazor Server Web Application.

In part 4 of the series, I'm going to show you how to use EF Core with MongoDb in Blazor Server Web Application.
Articles in this series:
Entity Framework Core (EF Core) is a popular Object-Relational Mapper (ORM) framework for .NET applications. While primarily designed for relational databases, it has expanded its capabilities to support NoSQL databases, including MongoDB. This article will guide you through the process of using EF Core with MongoDB in your .NET 8 projects
Before diving into the code, it's crucial to understand the nuances of using EF Core with MongoDB. Unlike relational databases, MongoDB is a NoSQL database, meaning it doesn't adhere to the traditional table-row structure. This introduces certain limitations and differences in how EF Core operates with MongoDB compared to relational databases.
In Part 1 of this series, I've explained the development environment setup for this article, that I will repeat here for the users who have not gone through it.
Starting a new Blazor project from scratch will require you to implement so many boilerplate features. You will end up wasting weeks of time.
Brick Starter Template for Blazor can help you save weeks of time by providing the full boilerplate implementation with 13+ ready to use features at fraction of cost.
Brick .NET Starter Template for BlazorIn order to follow along with this articles, you will need:
If you are fan of command line tools or want to know more about the tooling, see ASP.NET Core Blazor Tooling
If you are not familiar with setting up MongoDB for development on windows, here is a quick walkthrough of what you will need:
We are going to use this sample database to build something interesting that makes sense and has a real-life use cases instead of just a sample table with a few fields.
Create ASP.NET Core Blazor Server Web Application

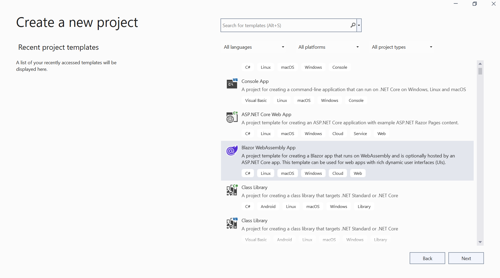
In the Additional information window, select .NET 8.0 (Long Term Support) in the Framework drop-down if not already selected and click the Create button.
Open Tools > Nuget package manager > Nuget package manager console and type the following command:
install-package MongoDb.EntityFrameworkCore
This will install all the necessary files for accessing the northwind database we created in MongoDb using Entity Framework Core Code First.
In the example northwind database, there is already a customers table with some data in it. We are going to display the first name and last name of the customer. So, let's create a folder in the root called Model and add new file called Customer.cs that contains following class definition.
using MongoDB.Bson;
using MongoDB.Bson.Serialization.Attributes;
using MongoDB.EntityFrameworkCore;

namespace BlazorAppPart4.Model
{
    [Collection("customers")]
    public class Customer
    {
        [BsonId]
        public int Id { get; set; }

        [BsonElement("last_name")]
        public string? LastName { get; set; }
        [BsonElement("first_name")]
        public string? FirstName { get; set; }
    }
}Next, we are going to create a new class called AppDbContext that inherits from DbContext class of entity framework core. Add another cs file called AppDbContext.cs in the models folder and paste following code.
using Microsoft.EntityFrameworkCore;

namespace BlazorAppPart4.Model
{
    public class AppDbContext: DbContext
    {
        public DbSet<Customer> Customers { get; init; }
        public AppDbContext(DbContextOptions options)
       : base(options)
        {
        }

        protected override void OnModelCreating(ModelBuilder modelBuilder)
        {
            base.OnModelCreating(modelBuilder);
            modelBuilder.Entity<Customer>();
        }
    }
}Next, we want to use repository pattern to ensure data access code is separate and testable. Add another folder in the root of your project called Repositories and add a new cs file called ICustomerRepository.cs with below code:
using BlazorAppPart4.Model;

namespace BlazorAppPart4.Repositories
{
    public interface ICustomerRepository
    {
        Task<List<Customer>> GetAllAsync();
    }
}
Once you are done, add 1 more file called CustomerRepository.cs with below code:
using BlazorAppPart4.Model;
using Microsoft.EntityFrameworkCore;

namespace BlazorAppPart4.Repositories
{
    public class CustomerRepository : ICustomerRepository
    {
        private readonly AppDbContext _db;
        public CustomerRepository(AppDbContext db)
        {
            _db = db;
        }

        public async Task<List<Customer>> GetAllAsync()
        {
            return await _db.Customers.ToListAsync();
        }
    }
}The AppDbContext context will require MongoDb connectionstring and database name. It is recommended to create an application wide setting section in the AppSettings.json. Open your AppSettings.json and 'AppConfig' section from below. I'm showing my full AppSettings.json file for your reference:
{
  "AppConfig": {
    "Database": {
      "ConnectionString": "mongodb://localhost:27017",
      "DatabaseName": "northwind"
    }
  },
  "Logging": {
    "LogLevel": {
      "Default": "Information",
      "Microsoft.AspNetCore": "Warning"
    }
  },
  "AllowedHosts": "*"
}Add AppConfig.cs class in your project and then add below code in the class definition:
namespace BlazorAppPart4
{
    public class AppConfig
    {
        public AppConfig() {
            Database = new DbConfig();
        }
        public DbConfig Database { get; set; }
    }
    public class DbConfig
    {
        public string? ConnectionString { get; set; }
        public string? DatabaseName { get; set; }
    }
}Next, we want to configure dependency injection so that Repository and AppDbContext classes that we created in our project can be injected where required. Here is my Program.cs:
using BlazorAppPart4;
using BlazorAppPart4.Components;
using BlazorAppPart4.Model;
using BlazorAppPart4.Repositories;
using Microsoft.EntityFrameworkCore;

var builder = WebApplication.CreateBuilder(args);

// Add services to the container.
builder.Services.AddRazorComponents()
    .AddInteractiveServerComponents();

var appConfig = builder.Configuration.GetSection("AppConfig").Get<AppConfig>();
if (appConfig == null)
{
    throw new InvalidOperationException("Db connectionstring not found");
}
builder.Services.AddDbContext<AppDbContext>(options =>
options.UseMongoDB(appConfig.Database.ConnectionString ?? "", appConfig.Database.DatabaseName ?? ""));

builder.Services.AddTransient<ICustomerRepository, CustomerRepository>();
var app = builder.Build();

// Configure the HTTP request pipeline.
if (!app.Environment.IsDevelopment())
{
    app.UseExceptionHandler("/Error", createScopeForErrors: true);
    // The default HSTS value is 30 days. You may want to change this for production scenarios, see https://aka.ms/aspnetcore-hsts.
    app.UseHsts();
}


app.UseHttpsRedirection();

app.UseStaticFiles();
app.UseAntiforgery();

app.MapRazorComponents<App>()
    .AddInteractiveServerRenderMode();

app.Run();
Please note on line 13 above, we are reading our AppSettings.json section called AppConfig and then convert it to AppConfig class object. On line 18, we are configuring Entity Framework Core MongoDb data access connection string. On line 21, we are resolving the customer repository. The other part of the file has no changes.
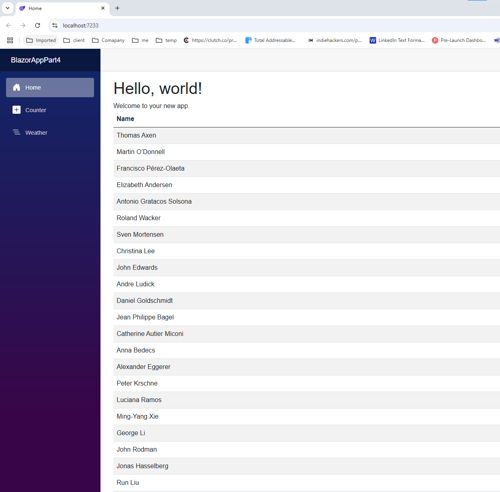
Finally, open Components/Pages/Home.razor and replace the content of the file with below:
@page "/"

@using BlazorAppPart4.Repositories
@using BlazorAppPart4.Model

@inject ICustomerRepository customerRepo
@rendermode RenderMode.InteractiveServer

<PageTitle>Home</PageTitle>

<h1>Hello, world!</h1>

Welcome to your new app.
@if(customers.Any())
{
    <table class="table table-striped table-responsive">
        <thead>
            <th>Name</th>
        </thead>
        <tbody>


    @foreach (var cust in customers)
    {
                <tr>
                    <td>
                        @cust.FirstName @cust.LastName
                    </td>
                </tr>
    }
        </tbody>
    </table>
}
else{
    <p>No customers found</p>
}


@code {
    List<Customer> customers;
    protected override async Task OnInitializedAsync()
    {
        customers = await customerRepo.GetAllAsync();
    }

}
Download Full Source Code of Part 4
In this article, we covered the step-by-step tutorial on How to use EF Core with MongoDB in the Blazor Server Web Application of the Blazor web app development series.
Ready to unlock the full potential of Blazor for your product development? Facile Technolab, a top Blazor Development Company in India providing Blazor development services can help you bring your vision of product MVP to reality.

Related Microsoft Blazor Articles:
Related ASP.NET MVC Articles:
IT Staff Augmentation Case Studies:
Custom Software Development Case Studies:
Web Development Case Studies:
Product Development Case Studies:
Legacy Modernization Case Studies:

Subscribe to Facile Technolab's monthly newsletter to receive updates on our latest news, offers, promotions, resources, source code, jobs and other exciting updates.

